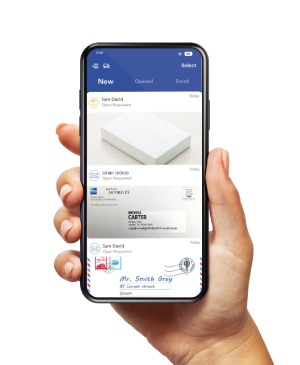
A letter reaches your mailbox, but the person who needs it works in Slack, Google Drive, or a task manager. Downloading a scan, uploading it somewhere else, and sending a reminder adds another handoff.
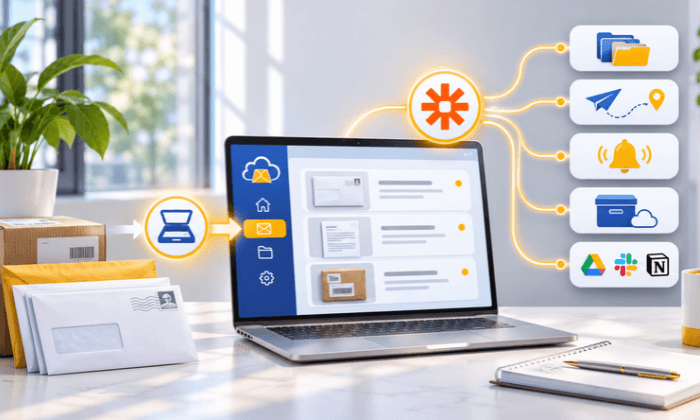
You can automate incoming postal mail with Zapier by connecting a mail event to an action in another app. For example, a completed content scan can start a file upload, while a new mail record can start a team notification. PostScan Mail handles receipt and requested physical processing; Zapier moves the available information into your workflow.
Start with one event and one outcome. A useful first workflow is saving completed scans to a designated Google Drive folder. Once that works, you can add notifications, review tasks, shipment records, or billing archives.
How postal mail automation works
A Zap is an automated workflow. Its trigger is the event that starts it, and its action is the next operation, such as uploading a file or creating a task.
With the PostScan Mail Zapier integration, the source event comes from activity in your mailbox. The destination app uses the information that event provides. Your account permissions, available fields, and Zapier plan determine how you configure the workflow.
The physical and digital stages remain separate. Receiving an envelope creates a mail record. Opening and scanning its contents produces a document. A Zap cannot upload a content PDF that has not been created.
Choose the event that matches your goal
Use New Mail Received when your team needs to know an item has arrived. Use Open & Scan Completed when the next step needs the scanned document. Open & Scan Requested records a request; it does not mean the document is ready.
Other events support later stages, including AI Summary Completed, Ship Items Completed, and Billing Statement Available. Check the current PostScan Mail trigger listing in Zapier when building your Zap, because labels and available fields can change.
Five practical workflows for incoming postal mail
| Goal | PostScan Mail trigger | Example destination action |
| Archive a content scan | Open & Scan Completed | Upload File in Google Drive |
| Alert the team | New Mail Received | Send Channel Message in Slack |
| Assign document review | AI Summary Completed | Create a task in Asana |
| Log a forwarding shipment | Ship Items Completed | Create a spreadsheet row |
| Archive account billing | Billing Statement Available | Save the supplied statement PDF |
Each example below is a workflow you can configure and test. Destination apps may require permissions or plan features, and a field mentioned in an example must be present in your selected trigger’s test data.
Save Mail Scans
Notify Your Team
Create Review Tasks
Track Forwarded Shipments
Archive Billing Statements
1. Save completed mail scans to Google Drive
Use this workflow when your team keeps correspondence in a shared document repository and wants to avoid downloading and uploading each scan.
Start with Open & Scan Completed. In Google Drive, select Upload File and map the trigger-supplied scanned PDF to the file input. Choose the destination folder and give the file a name that includes the Mail ID.
For example, an operations team could use a naming pattern such as received-date_mail-ID.pdf. The identifier helps staff trace a saved document back to its mailbox record without putting sensitive information in the filename.
An envelope image and a content scan are different files. Test that the uploaded document contains the letter’s pages. Zapier’s Google Drive documentation explains the Upload File action and the access required for connected folders.
If you later request a rescan, decide whether the new file should replace the earlier copy or be saved as a revision. A separate Rescan Completed workflow can handle that event. Do not assume a new scan automatically updates a file already saved in Drive.
2. Notify your team when mail arrives
Use New Mail Received to send a message through a communication app such as Slack. Include enough information for the recipient to identify and handle the item, using available fields such as Mail ID, recipient, sender, and received date.
A sample notification could read:
- “Mail item 4821 arrived for Operations. Review the item in PostScan Mail and decide whether a content scan is needed.”
- This alert prompts action without implying the contents have already been scanned. Keep document contents and attachments out of channels with broader access than the mailbox itself.
- Start by sending alerts to one designated channel. If the volume becomes distracting, add routing conditions using fields you have verified in test data. An envelope’s sender name can help with routing, but it doesn’t indicate what the document contains.
3. Create a review task after an AI summary is ready
Use AI Summary Completed to create a task in a tool such as Asana. Map the Mail ID and summary into the task description, then assign a reviewer.
For example, the task title could be “Review mail item 4821.” The description can contain the available summary and instructions to read the source document before deciding what to do.
Treat the summary as a reading aid. Verify amounts, dates, instructions, and obligations against the scan. Do not automatically approve a payment or set a legal response deadline from an AI summary.
PostScan Mail’s trigger can also fire when a summary is regenerated. Decide whether your workflow should update an existing task or create another one. If you want one task per mail item, keep the Mail ID in a searchable field and check for an existing record before creating a task.
4. Record forwarded shipments in a tracking log
Use Ship Items Completed to record when a forwarding shipment has left the PostScan Mail location. Map available shipment details into a spreadsheet or database.
Useful columns include the shipment identifier, carrier, tracking number, ship date, and associated Mail IDs. A remote team can then see which physical originals have been sent onward without searching across several inboxes.
Keep this log distinct from tracking a retailer’s delivery to the mailbox. Forwarding creates a separate shipment. The carrier and tracking number for that onward journey may differ from those used for the original delivery.
A shipped event is also different from a delivery event. Recording dispatch does not confirm that the destination received the item.
5. Archive PostScan Mail billing statements
Use Billing Statement Available to save the available statement PDF to your finance document store or record its details in a billing log.
This workflow concerns your PostScan Mail account’s billing records. It does not classify every invoice that arrives in your postal mailbox or turn a document into an approved accounting transaction.
For example, save the statement using its statement ID and billing period, then let the person responsible for reconciliation review it. Where supplied, payment status and receipt information can support that review.
Check which files the trigger actually supplies. If a receipt is unavailable, the workflow should not label the saved statement as proof of payment.
Connect Your Mailbox to Your Workflow
Explore how PostScan Mail and Zapier can connect your mail activity with the apps your team uses.
Explore the Zapier Integration
Build your first Zap step by step
Use the scan-to-Drive workflow as your starting point. These steps describe the setup; the exact controls may differ as the apps change.
1. Prepare Your Accounts
2. Select a Mail Trigger
3. Add the Drive Action
4. Map and Test the File
5. Turn On Your Zap
1. Prepare the accounts and destination
You need an active PostScan Mail account, a Zapier account, and access to the destination app. For this example, create or select a Google Drive folder that the connected Google account can use.
Use a non-sensitive sample document for testing. Decide who should access the folder before sending correspondence there.
2. Select the PostScan Mail trigger
Create a Zap, select PostScan Mail as the trigger app, and choose Open & Scan Completed. Connect the intended mailbox account using the authorization method shown in Zapier.
Test the trigger and inspect its sample record. Confirm it includes the PDF content you need, along with an identifier for the mail item. If no suitable record is available, complete a sample scan and test again.
3. Add the Google Drive action
Select Google Drive and its Upload File action. Connect the Google account, choose the folder, and map the document field from the trigger into the File input.
Use the fields displayed by the editor. Pasting a label such as “scanned PDF” into the file input does not map an actual document.
4. Map a filename and test the upload
Include the Mail ID in the filename. Add a date only if the corresponding value is available and in the format you want.
Run the action test. Open the uploaded file in Drive and check the pages, filename, destination, and sharing settings. A successful step is not enough if the file went to the wrong folder.
5. Turn on the Zap and check a new event
After the sample works, turn on the Zap and check the next completed scan. Confirm that the new item produces the intended file.
Record the workflow owner, connected accounts, folder, trigger, and test date. Recheck the workflow after changing permissions, account connections, or file destinations.
Prevent duplicates and incomplete handoffs
Automation works best when each event has a clear purpose, and each output has a traceable reference.
For a document archive, retain the Mail ID in the filename or record. For a shipment log, use a shipment identifier. For billing records, use the statement ID. Choose an identifier that matches the record you want to keep unique.
Replaying a run or regenerating a summary can create a second output if the workflow always creates a new record. Where needed, add a lookup and update step instead. Extra steps and searches may require a higher Zapier plan.
Also decide what happens when a required value is missing. A workflow intended to upload a document should stop or send an exception alert if the file is absent. It should not create an empty record that looks complete.
Troubleshoot the workflow before expanding it
If a Zap does not produce the expected result, check the stage that failed:
- No trigger record — confirm the event happened in the connected account and that you selected the correct event.
- Missing PDF — confirm that content scanning completed and that you mapped the document field.
- Permission error — review the app connection and destination access.
- Held run — check account limits, plan features, and connection status.
- Duplicate output — inspect test runs, replays, regenerated events, and create-versus-update logic.
Use Zap history to inspect the failed step and its data. Zapier’s troubleshooting guide explains how to investigate errors and replay failed work after fixing the cause. Before replaying, check whether any earlier action already created a file, task, or row.
Costs and document access to review
PostScan Mail includes the Zapier integration with its subscriptions at no additional integration charge. Mail processing still follows your plan’s allowances and fees.
Review PostScan Mail plans and pricing for content scans, storage, forwarding, and other requested actions.
Zapier has its own plans, task limits, and feature requirements. A workflow with several actions, searches, or routing steps may need a different plan from a single-action Zap.
Check those requirements before turning on a workflow for all incoming items.
Connecting another app also creates another place where your mail information may be stored.
Use destinations your organization has approved, limit access to the people who need it, and decide how long copies should remain there.
Deleting or shredding an item in PostScan Mail should not be treated as deletion of copies already sent elsewhere.
Start with one workflow you can verify
Choose the handoff your team repeats most often. Save a completed scan, send an arrival alert, or create a review task. Test the source event and the output before adding more steps.
To begin, review the PostScan Mail Zapier integration and select one event that matches your process. Give the workflow an owner and a clear definition of success.
Access & Manage Your Postal Mail
Anywhere Anytime!
Receive mail anywhere, on any device.
We offer 1000+ mailing addresses for both personal and business use.